I've been wanting basement storage since I bought the van but didn't think the expense was justified, then I saw the posts from "northleftcoast" and the box offer for an RB Van.
http://sportsmobileforum.com/viewtopic.php?f=13&t=6757
and
http://sportsmobileforum.com/viewtopic.php?f=44&t=6838
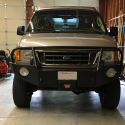
First issue was the need to mount the spare on the back of the rig to clear space for the basement box, and as luck would have it "ctimrun" had a barley used Aluminess carrier for sale
http://sportsmobileforum.com/viewtopic.php?f=7&t=7151, score!
BTW- Anyone trying to install an Aluminess Spare Tire Carrier. It was impossible, at least on my rig, to remove the hinge pin with a sledge hammer, tried forever and it was dicey proposition trying not to damage the van body, even with tons of cardboard protecting it. The solution, use a pneumatic chisel (I went to my buddies shop, where I take my cars, it took them seconds to pop it out).
Back to the box install...
After discussing with Sam we decided on the size 32" wide x 14" depth x 15.5" fore/aft. 14" depth would sit at the same height as my receiver hitch, very clean looking installed (see below), great suggestion Sam!
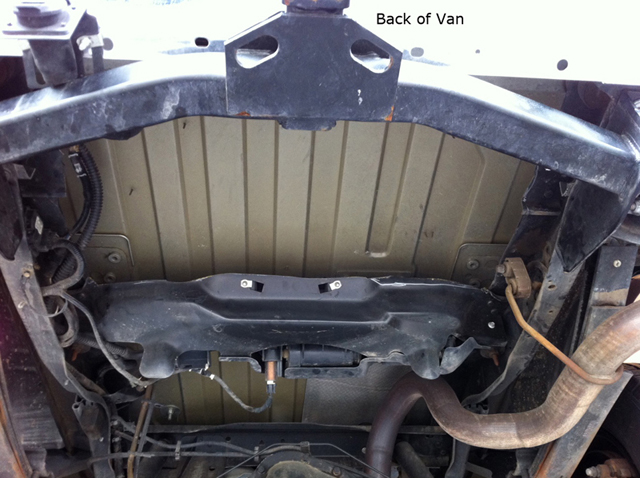
Step 1: Remove under body spare tire carrier. Used a sawzall, took about 15 minutes. Fortunately I was able to use the hoist at my buddies shop, which obviously made the job much easier. I didn't want to deal with re-locating my emissions canister so I left that part of the mount intact. This photo pretty much sums it up.

Out, floor of van exposed:
Step 2: Cut opening in floor. Measure twice, ok more like three time and cut once! Used Multi-master (Oscillating multifunction tool) to get a nice clean cut, took two blades, 20 minutes.


In the mean time the box arrived via USPS, very well crafted it's almost a shame that it will be hidden under the rig!
Step 3: Check position / Mark box opening to be cut. Jacked box into place and marked from inside of van on top of box.

I ran into a little problem here, the topside back of the box had a 3/8" gap and was not sitting flush with the underside of the van floor. There is a slight difference on the underside of the van floor toward the back of the van, it is rounded and has a lip.
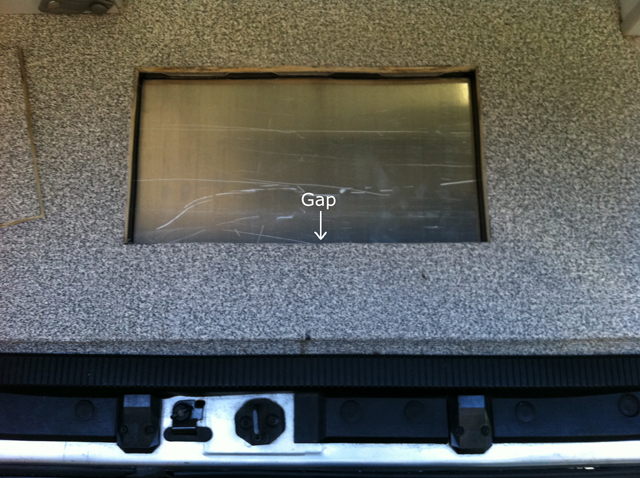
Close up of gap.

So I need to move the box toward the front of the van just a little bit maybe 5/16".
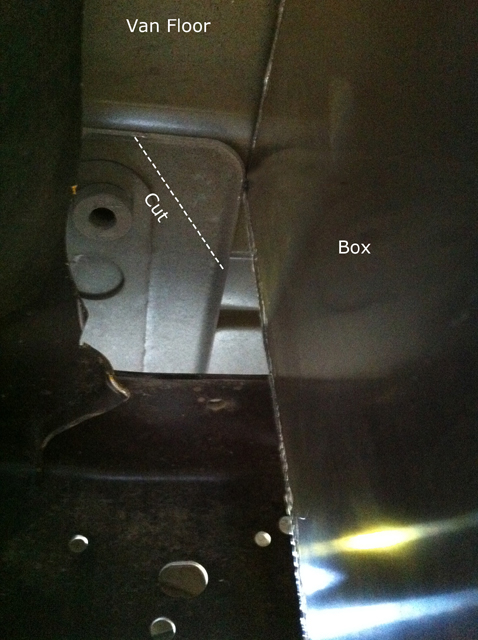
Which involved cutting the corners off the the plates (which are for the 3rd row seats, if the van was stock). This was the most difficult part of the whole project, they were a major pain. So, if you end up dong this in your SMB I would strongly suggest getting the box 15" fore/aft instead of 15-1/2", then you won't have to deal with this issue.
Looks like an easy cut, ha!
Step 4: Cut the hole in the box w/ a circular saw w/ carbide blade.
Cut 1" smaller than mark (mark can't bee seen in this pic) to allow lid to rest on lip and have room for 1/2" vinyl trim.
At this point I decided to paint the sides and the bottom of the box black, so it would not be as noticeable under the van.
Here it is with the trim.

Step 5: Clamp box into position and check for fit.

Step 6: Measure, drill holes and bolt box into place. (I was going to countersink the heads into the floor, but figured I didn't need to, carpet would be over them anyway and could always do it later if need be). I used 2-1/2"x1/2" bolts with large fender washers and lock nuts.
I located the bolts as close to the walls of the box as reasonable for strength.
I choose not to use weather stripping (since the box was perfectly flush against the underside of the van floor. Instead, I shot in a generous amount of silicone to weather proof it.

Finished! Totally worth the (minimal) effort. BTW- Also added a battery powered LED cabinet light inside of the box.


 Linear Mode