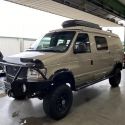
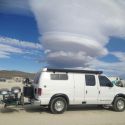
Since you ask, here's the process I went through to mount these brackets and the awning.
It's written for somebody who doesn't necessarily have well-developed skills for some of this stuff, so if you are skilled, feel free to ignore my experiences and advice and/or laugh at or correct anything you disagree with.

Test fit unpainted brackets. Make decisions about finishing them. Decided against powder-coating. I liked the idea, but the logistics made it too big of a pain. (I wish they would have come powder-coated, but you can argue that an unfinished bracket allows inspection for any flaws in the metal and/or welds.) Thought about hardening the brackets, but decided that with 3 brackets they were strong enough as-is. Decided against using plastidip as a padding due to potential issues regarding clearances, especially with regard to the forward bracket where clearance from the top of the door is especially critical.
I thought about using a piece of cut-open bicycle inner tube as padding, with a little contact cement to hold it flat on the bracket. This would only go on the part that presses against the door post or upper side panel. I don't think any plastic padding will hold up on the clamping surfaces. In the end I decided against this because I felt that a tight fit and eliminating any motion of the bracket was more important than padding. It is possible to change one's mind about this and add inner tube padding later without too much trouble. Just loosen the bracket and slide in the already-contact-cemented rubber underneath, then tighten the bracket again.
Note that differences in each van mandate a great deal of attention to the fitting process. It may be that body curvatures both laterally and vertically are not the same on each van. The depth of the rain gutters also varies. Plus they put a bunch of body putty in the rain gutter, at least on my 2008, making it more critical to clamp the brackets properly. Be thoughtful and careful as you test fit the brackets at each step. The idea is to make put them on solidly and well enough that they will not cause you trouble later.
I ended up choosing just to paint the brackets with a rattle-can of black Rustoleum. They were painted on Friday in order to have a couple of days for the paint to cure. Oh and remember to clean them with a degreaser before painting. I bought two sets of brackets so I degreased and painted them both at that time.
Note that for tools, you'll need:
* A sharp and good quality 3/16 drill bit for the holes through the back of the awning case and the brackets.
* Unless you're exceptionally industrious and patient, you'll probably want a drill to help you get the drill bit to make the holes.
* Make sure you have some cutting oil on hand. It will make drilling the holes much easier. Do yourself a favor and don't use WD40. It's not a good cutting oil. 3-in-1, SAE 30, etc are all okay. Or, (gasp) buy a purpose-sold cutting oil. (It's probably not purpose-made for cutting, but it will be sold for cutting.)
* You'll need a 3/16 allen key, preferably in socket form and in right-angled non-socket form.
* You'll also need a 3/8" wrench and a 1/2" wrench, preferably available in both box-end and socket form. (Use a maximum 3/8 drive ratchet -- you don't want to overtorque anything.)
* Finally, you'll also need a #2 phillips screwdriver.
* And you'll also want a spray can of some kind of good lube for the awning's pivot points. I prefer a good PTFE lube where the carrier oil dries up leaving the PTFE behind. A lube like this won't attract dust. I used
this stuff because it was in my collection.
* one more thing: a small throwaway paint brush. It may be needed, along with your original spray paint, for touching up the brackets after installation. Maybe some qtips or a bit of paper towel would work in a pinch.
* oh and you may want a bench vice in case you need to tweak the front bracket's fit. (I did need to do that.) A couple of pieces of hardwood as vice-jaw padding to protect the bracket's paint are also a good thing to have on hand.
On Sunday, a friend came over to help. 2 people is the minimum for the job, IMO. 3 people is probably the max. The 3rd person's function would mostly be to hand the others various tools.
Decided not to work outside because the weather was being weird. First cloudy and cool (i.e. pleasant), then hot and sunny (not so pleasant). So we made sure we had enough space cleared in the garage to extend and retract the awning as part of test-fitting. It turned out to be a good idea, because wind came up for a while and that would have been disastrous if we were outside. Side benefit to working inside: Got some stuff cleaned out of the garage. Collected various ladders (2 6-foot step ladders, 1 8-foot stepladder (useless in this situation), 1 4-foot stepladder and a 2' stepladder that is extra wide so it's like a mini-scaffold. I recommend having at least two 6-foot step ladders available, those and the 2' scaffold were the most useful. But other combinations will be fine. Just be sure you'll be able to easily get up to the height of the van roof).
Raise the penthouse top. Put the bed, if available, in sleeping position (not up against the top). Move the bed more forward than usual to position it as a support platform for the person who is going to end up inside to access the rear of the center bracket when the awning is extended (more on this later).
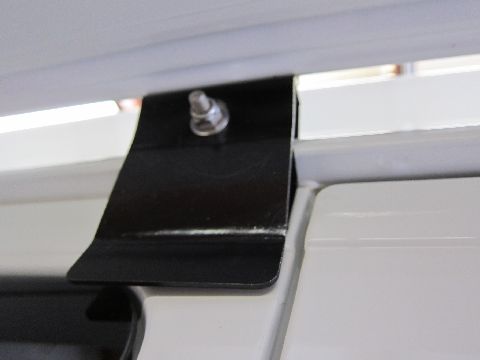
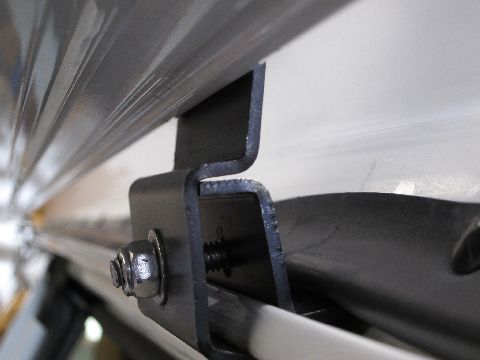
Test fit the two end brackets, loosely bolting on the clamping pieces. Note that the bracket clamping bolts need to be mounted with the heads facing in, towards your Sportsmobile poptop, in order to ensure maximum clearance from the top. It might be prettier to mount them head-out, but it puts the top's gasket at risk. Also note that the clamping pieces have two directions they can be fitted in. The hole is slightly off-center top to bottom, allowing a choice in how that piece is mounted, which can help with getting the bolt aligned properly. In the case of my 2008 E-350, the holes seemed best mounted in the "up" or "high" orientation.
Pay special attention to the exact fit of the forward bracket. If a bracket needed to be hardened, this would be the one. The other two brackets have gussets that strengthen the bottom angle. The front bracket can't have a gusset, since it gets mounted between the front door and forward side door. The gusset would prevent the door from closing. So this bracket is a bit more flexible. In the end, the 3-bracket system seems to overcome any issues about how soft the steel is. (If you were going to harden the forward bracket, be sure you've test fitted it and made it fit perfectly before hardening.)
In our case, we had to bend open the bottom-most bend by a few degrees because with the awning mounting section vertical (90-degrees to the floor), the part of the mount that rests against the door post was not touching the post. To be able to tell how much we were bending it, we placed the piece on its edge on a piece of cardboard and traced it on both sides of the bracket through the first two bends. That way, as we changed the bracket's bottom angle we could compare it to the tracing. Then the bottom of the bracket was clamped in a heavy bench vice using wood to pad the jaws. As it turned out, the way the bracket sat in the vice, it provided some reference for the angle anyway, based on the way the next angle cleared the jaws. We carefully bent for a bit, purposely stopping before getting to the point where we thought it had to be. We then test-fit it again to confirm that we needed to go a bit more. After confirming, we repeated the process with the vice and test-fit again.
Satisfied with the fit, we undid the clamping bolts and put on some of the included anti-seize compound. Repeat:
Put anti-seize on these bolts now. Snug the clamping bolts on both the forward and aft brackets. Re-examine the fit of the brackets, making adjustments as needed. Tighten the bolts to their final torque. Examine the fit again with an especially critical eye towards making sure the top of the front door cleared the forward bracket without striking it. Loosen the bolts and adjust again if needed.
Lower and raise the penthouse roof to make sure you're happy with all clearances. Or trust in fate, if you prefer, and simply leave the top up.
At this point we hung the Fiamma on the two brackets to see what effect the weight of the bracket would have. Care is needed to be sure you get the top of the brackets in the slot at the top of the rear of the awning case. The first fitting of the awning required a little bit of loosening and repositioning the forward bracket as the weight dragged the bracket down a bit and allowed the door to strike it. Make sure you like the forward/aft position of the awning.
Once we were happy with that, we test-fitted the center bracket. We liked it just aft of the aft side door. By just aft, I mean the forward edge of the center bracket is about 1/16" aft of the aft edge of the side door opening. (Apologies if all the afts are driving you a little daft -- limitations of language and all, a picture's worth a thousand words perhaps but it was too time-consuming to photograph this process and pay attention to the details.
)
There was a moment where it seemed like the center bracket might have issues with interfering with the awning case by pushing up or possibly out (away from the van) on the case. In addition, there was a moment where it seemed like the center bracket might not lie flat against the back of the awning's case. Careful positioning and adjustment solved all of these issues. Remove the bolt, put anti-seize on it. Put it back on. Examine the fit of the center bracket again. Tighten the center bracket's clamp to it's final torque.
Now it's time to drill the holes for the bolts which would hold the awning to the brackets.
At this point, the awning is not bolted on, but is merely hanging on the forward and aft brackets. (The center bracket doesn't fit into the slot at the top rear of the awning's case so it doesn't come into play until the hole is drilled and the awning case is bolted to the bracket.)
With the awning hanging on the brackets, consider lowering and raising the penthouse top again to make sure all is as you want it to be.
In order to drill the holes through the back of the case and through the brackets, you will have to extend the awning at this point.
Because the awning case is not yet bolted on, we used extreme care to extend the awning in order to prevent any possibility of it leaping/sliding/falling off the brackets. The awning was extended enough to extend the legs, then we carefully checked that the awning case was still secure, then cranked, repositioned the legs, etc until the awning was fully extended. The awning was retracted enough to tension the fabric slightly to make it easier to work under and around it.
If you're working outside, this is the part where you really hope the wind doesn't come up.
Further inspection of the brackets and their positions ensued. Minor adjustments were made. The forward right penthouse window and screen were unzipped to allow for access to the rear bracket. (Unzipping them previously would mean cycling the top with unzipped windows, so this is probably the best time to do it.)
After carefully considering our current position (did we like the position of the awning, is the front door clearing properly, are the brackets holding up, are there any issues that need to be solved still, etc), we were ready to drill the 3/16" holes for bolting the awning case to the brackets. Make your final decision about where they go. The Fiamma manual says they should go on the lowest rib of the case. Note that the flat-head screws need to be positioned so the edge of the head doesn't hit the next rib of the awning case. I.e. you'll need the hole at least 1/4" away from the edge of the case rib.
Since it's hard to put cutting oil on a vertical surface, you'll be putting it on the drill bit. Put a couple of drops on the first 1/3" to 1/2" of the bit. Dab the tip on a rag to get rid of excess. Drill for a few seconds. Stop and put cutting oil on the bit. Drill again. More cutting oil, more drilling, then you're through. Clean the hole and wipe the shavings off the little shelf at the bottom of the awning case.
Put anti-seize compound on the bolt, and put in the bolt and make it snug. Remember, the head of this bolt stays on the inside of the case and the nut will go on the back side of the bracket.
Drill either the forward or aft bracket first, then the other end bracket, then finally the center one, bolting each hole as you go.
Bolting the center bracket requires one person up inside the penthouse working the nut with a 3/8" wrench or racket and the other person below the awning on the ladder holding the bolt with the phillips screwdriver.
Once all the bolts have been tightened and double-checked and you've reexamined all the fit issues and determined that you did it right, you're almost done.
You'll want to cycle the awning to make sure everything is hunky-dory.
Before you retract it: Let's face it -- You either haven't lubed it recently (if it's been up before) or the factory didn't lube it appropriately or whatever so , be sure to lube all the pivot points on the lateral arms (the ones that extend the awning). Lube the pivot points at the top of the legs. If you're using PTFE lube, put some on the cams at the end of the awning's lead bar where it strikes the red markers as it comes in.
Retract the awning. Check the door fit again regarding clearance from the front bracket. In our case, we ended up making one more adjustment to the forward bracket to get it just right.
If the awning doesn't extend/retract properly, this is an excellent time to make the adjustments suggested in the Fiamma manual. If you haven't messed with this yet and you don't have your manual handy, there are two adjustments. One is at the aft end of the awning, where you turn a wheel on the end of the roller to make the aft end pull in at the same rate as the forward cranking end. You turn the wheel clockwise when looking at it from the rear facing forward along the van. There is another adjustment where you tighten/loosen the upper bolt on each shock absorber where the lateral arms are mounted. Tightening the bolt raises the arm, loosening it lowers it. It's very obvious that you're adjusting the arms. They move a lot when you turn the upper bolt. Adjust the arms so they retract smoothly into the case and clear the bottom edge of the case without striking it.
If necessary, touch up the paint on the forward bracket if any test-fitting door strikes marred the paint. If you're using rattle-can spray paint, spray the paint onto a piece of paper or paper plate somewhere away from the van and other things that might get oversprayed. Use a small throwaway paint brush to pick up the paint off the paper, then brush it on. This avoids a tedious masking job to prevent accidentally painting the van or its interior.
That's it. You're done. It's almost too easy.
We expected it to take maybe 2 hours. Thank God for optimism or I'd never start a project. It ended up taking 3.5-ish hours. That includes moving the van outside, then deciding to move it back inside, clearing some space in the garage and a few false starts/stops in the process. Hopefully the description above will save you some time that we had to learn with a little trial and error.
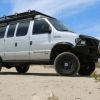
Pursuant to request below, here are some pics.
Note that the small amount of staining on the paint around the forward mount was from the previous mount which did have a bit of rubber padding behind it.


 Sporty Spice
 Linear Mode